Astrophotography, Pixel-by-Pixel: Part 5
Welcome to the (planned) penultimate blog post of this series! I've had tons of fun diving into this journey, and I hope all you have as well. To revisit the earlier installments, you can check out any of the articles below. All of the previous posts build upon one another, and it is loosely recommended to take a look at those in order.
Astrophotography, Pixel by Pixel: Part 1 - Well Depth, Pixel Size, and Quantum Efficiency
Astrophotography, Pixel by Pixel: Part 2 - Focal Ratio Effects
Astrophotography, Pixel by Pixel: Part 3 - Gain/ISO and Offset
Astrophotography, Pixel by Pixel: Part 4 - ADUs and You
This post will be departing from a direct addition to the previous posts, in that all of the other concepts are not strictly necessary to understand what we will be covering here. That being said, it would still be beneficial to have a basic understanding of how pixels function before charging ahead.
SHEDDING SOME LIGHT ON WAVELENGTHS
Up until now we’ve assumed that all incoming light is the exact same. We’ve also treated every pixel as the same type even if the physical characteristics such as opening size were slightly different. It is now time to see some effects on capturing photons after looking at differences between types (wavelengths) of light and between two fundamentally different types of camera sensors.
Instead of all the incoming light being the exact same, and composed of the arrows I’ve been using in the diagrams in the previous installments, let’s instead envision light as the plastic spheroid shapes from a ball pit. Otherwise known as plastic balls. Each photon of light is a single ball, in addition we will imagine that they are all perfectly uniformly manufactured in their shape and size and all other characteristics except one: their color.

(Figure 1: Spectrum of Wavelengths of Light)
There is a different color plastic ball for every different wavelength of light. This difference between the plastic balls may seem innocuous, but it can have large impacts as to what happens in our imaging train, and in our choices of cameras and filters. All the different colors that we see with our naked eye and show up in our images are comprised of different wavelengths of light.

(Figure 2: Spectrum Split to Visual Light and Beyond)
These different wavelengths behave slightly differently when they interact with our pixels. A direct analogy with our buckets slightly breaks down at this point, but we can still make use of it in this discussion with just a slight stretch of the imagination.
ONE-SHOT-COLOR CAMERAS AND THE BAYER MATRIX
To see the impact, let’s first consider DSLR and One-Shot-Color (OSC) dedicated astrophotography cameras. For all their possible differences in pixel sizes, well-depths, total chip sizes, cooled options etc, this class of cameras all have one thing in common: The Bayer Matrix.
This is a pattern of filters that are placed over the top of the entire sensor. A filter is actually placed over the top of each pixel, and can either be red, green, or blue. These filters only allow a certain range of wavelengths through to be captured by our pixels and rejects all others. Imagine that the filters are a sort of gate, and each gate only lets through plastic balls that match the range of colors allowed by the color of the gate.

(Figure 3: Bayer Matrix over Pixel Array)
(https://en.wikipedia.org/wiki/Bayer_filter)
A red filter over a pixel would only let through the range of red plastic balls, and reject all others, and similarly for green and blue. Each bucket by itself is generally capable of catching any plastic ball that hits it: the Bayer Matrix restricts which color(s) of ball lands on each bucket.
The reason that a single color filter can allow more than one specific color of ball is that what we count as "red", "green", or "blue" is comprised of a range of wavelengths. We can loosely divide our range of plastic balls to mimic this sort of spread.

(Figure 4: Visible Wavelengths Divided into Color Channels)
Of course this is not a perfectly split or correlated model, but it is close enough to suit our purposes on this subject.
It's worth noting that while our "definition" of color can be separated very cleanly into blue, green, and red above, our filters themselves allow through some wavelengths that overlap a bit. Which plastic balls are allowed through each filter is more akin to this:

(Figure 5: Filter Wavelength Permission Overlap)
Here again the image is a good model, even if it is not perfect: I wouldn't call the green ball that is allowed through by the red filter within the "red" range any day. But this should still give a good idea about what is happening. To get a more scientific sense of the wavelengths allowed by filters and the spectrum overlap, you can see a real spectral graph here:
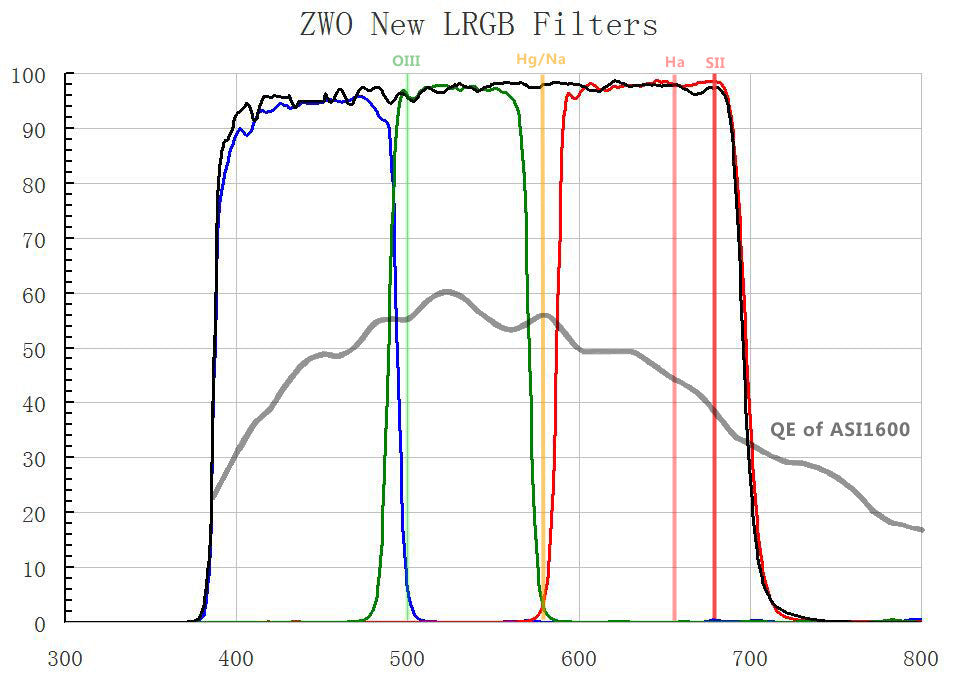
(Figure 6: Real Filter Spectra)
Let’s see how this works when a bunch of light comes from our target, and let’s assume that the target gives off the full spectrum of light (what is known as a “broadband target”). A whole bunch of our many-colored balls make it to our sensor. Then they are basically captured or rejected according to their color or wavelength by the Bayer matrix. This fills our pixel buckets based on the sensitivity of the sensor, and each pixel is only filled by the particular kind of light that it lets through. Let's focus on only one pixel at this time to see how this functions. Here's a pixel with a red filter over the top of it:
![]()
(Figure 7: Single Pixel with Red Filter)
Now let's pelt it with a smattering of incoming light that hits only this pixel:

(Figure 8: Single Pixel Photon Hits)
At first glance it may seem odd that the incoming light is one after the other in a singular column, but this is in general how it actually works. This is because incoming light is a Poisson process (not to be confused with a Poseidon process), and each photon can only hit a single pixel. Each photon is then let through or rejected based on if the photon is within the acceptable range allowed by the filter.

(Figure 9: Single Pixel Photon Acceptance)
Alright, so all of the photon-plastic-balls with check marks are accepted and make it into our pixel-buckets. The ones with the "X's" are rejected and do not make it into the pixel-buckets. So what happens to the rejected balls? They are generally absorbed by the filter, or scattered away.

(Figure 10: Captured and Scattered Photons)
This process is similar for the entire sensor and all of the pixels with their color gates. Each pixel has a filter over the top of it that is either red, green, or blue. Then each incoming photon has a particular color, and can only hit one pixel. That photon is then rejected if it is not a color within the range allowed by that color filter, and the photon is captured if its own color is within the range that is allowed by that particular filter.

(Figure 11: Bayer Array Photon Hits and Acceptance)
The reason this figure shows one red, two green, and one blue filter is because that is the usual ratio of filters over pixels in a Bayer matrix.
MONOCHROMATIC CAMERAS AND FILTERS
The other kind of camera sensor is monochromatic, or monochrome for just a slightly shorter description. This camera natively does not have any sort of filter or bucket gates over the top of the sensor. Each pixel accepts every kind of plastic ball that hits it and captures it according to the camera’s quantum efficiency. While this on its own can create some nice grey-scale images, we can still use this kind of camera to create color images. We do this by placing a filter over the entire sensor ourselves.

(Figure 12: Blue Filter Over Monochrome Pixels)
For broadband targets, we would take a full series of images with a green filter over the sensor, and likewise for blue and red. With a color filter completely covering the sensor, the only color of plastic balls that even makes it to the sensor are those that match the color of the filter.


(Figure 13: Blue Filter Photon Hits and Acceptance)
The advantage here is that every single pixel gathers that wavelength of light. Since each pixel does not have a filter over the top of it individually, every pixel is capable of capturing the incoming light. The exact same thing happens with the red and the green filters. While the filters do block out the light that reaches the sensor to a specific range of wavelengths, every single pixel is utilized to catch those balls that do pass through the gate. This is not to say that every single ball that makes it past the filter is actually collected: this is where the camera’s quantum efficiency comes in again.
For comparison, on our one shot color cameras with the Bayer Matrix, each pixel is only utilized based on the color of filter that is directly over it. This means that only ¼ of the incoming red range of plastic balls are actually captured, ¼ of the incoming blue range of plastic balls are actually captured, and ½ of the incoming green range of plastic balls are actually captured since that is the ratio of color filters in the Bayer Matrix (Tempered here as well by the quantum efficiency of the sensor. Starting to see why this property is so important?).
One shot color cameras do not use the full resolution of the sensor for each color channel. Monochrome cameras lend their full resolution to every color channel. Of course, more processing steps are required to create a final image when shooting with monochrome and filters.
I leave it as an exercise to the reader of what would happen with your resolution and ability to capture incoming light were you to use a color filter with a one shot color camera. You can post your discussion in the comments section at the bottom of the post.
NARROWBAND FILTERS
There is one more class of filters that is worth briefly discussing: Narrowband filters. These filters are incredibly restrictive in the wavelengths that they let through. For example a Hydrogen Alpha (Hα) filter would allow only through only particular color of ball instead of the entire range of red colored balls.

(Figure 14: Hα Spectrum)
These are useful for a couple of reasons. The first being that light pollution is the bane of astronomers from time immemorial. Since narrowband filters block all but a very narrow band of wavelengths, they block light pollution as well. Narrowband imaging can be done from the heart of a large city (like say, I don’t know...Seattle).

(Figure 15: Light Pollution Wavelength)
Since this very restrictive filter only allows one color of plastic ball through that is not of the same color as light pollution, the light coming from streetlights and the general glow from city lights never reaches your sensor. All of the light pollution color balls are rejected and scattered. The same goes for another large contributor to light that we often don’t want: the moon. Narrowband filters allow us to image deep sky objects even when there is a full moon out, though it still recommended to image away from where the moon is in the sky.


(Figure 16: Hα Photon Hits and Acceptance)
Of course, there are trade-offs just like near everything else in this hobby. The first is that not all astronomical objects are good candidates to image with narrowband filters. You will be primarily limited to emission and planetary nebula: those objects we know give off light of the wavelengths that match the narrowband filters. The other trade-off is that since we are limiting the light that we are gathering to a very small range, longer exposure times are needed to capture a similar amount of light. It is common with narrowband filters for each sub exposure to be 10, 15, or even 30 minutes long. Your gear setup will need to be able to achieve that. Finally, narrowband imaging is only realistically feasible with monochrome sensors.
Takeaways:
- One-shot color cameras including DSLRs have a Bayer Matrix which restricts the range of wavelengths of light allowed to reach each pixel. This effectively reduces the resolution of each color channel.
- Monochrome sensors allow all light to hit every pixel, though we need to manually introduce filters to create color images.
- Narrowband filters require monochrome cameras.
- Narrowband imaging lets you image through light pollution and the full moon.
You can check out the next part of this series here.
Take a look at a selection of excellent one-shot color and monochrome cameras, along with some filter sets below!